
Windows 10 is designed to be an always-connected, always-up-to-date operating system. It’s the most data-hungry version of Windows yet, but you can restrain it from going all-out on your home network with a few tricks.
Check Per-Application Data Usage
Despite all Windows 10’s automatic updates, the majority of data usage on your PC probably comes from the applications you use. Windows 10 includes a new “Data Usage” tool that allows you to see exactly how much data each application on your computer has been using. This will help you track down data-hungry programs, including third-party ones.
To check your data usage over the last 30 days, open the Settings app from your Start menu and head to Network & Internet > Data Usage. You’ll see a graph showing how much data your Windows 10 PC has used over the last 30 days, broken down between Wi-Fi and wired Ethernet.
To view which applications have been using data, click or tap “Usage Details” here. You’ll see a list of applications that have used data over the last 30 days, and the applications that have used the most data will be at the top of the list. This shows you exactly where your data is going. For example, you can see how exactly much data was used by your web browser of choice.

Prevent Automatic Windows Updates
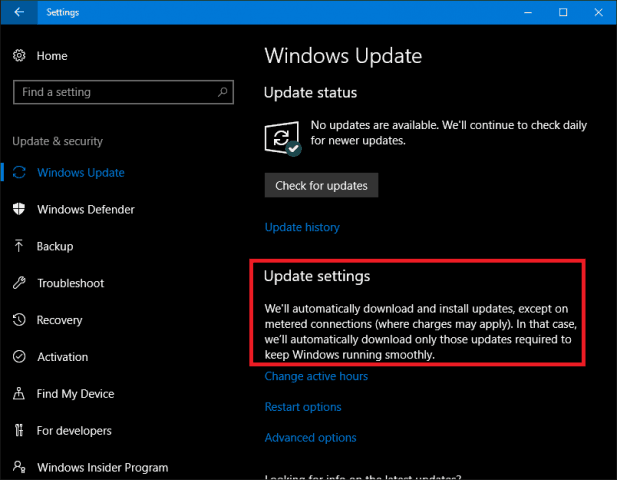
Windows 10 normally downloads and installs updates automatically without your input. Microsoft updates Windows 10 very often, and those updates can be fairly large. For example, Windows 10’s first big update, known as either the “November update” or “version 1511,” was about 3GB in size on its own.
There are several ways to prevent Windows 10 from automatically downloading updates, depending on the edition of Windows 10 you have. To do this on any PC–even ones with Windows 10 Home–set your home Wi-Fi network as a metered connection. Windows 10 won’t automatically download updates on that connection, but instead will prompt you. You can then choose when to download updates, or take your computer to another Wi-Fi network and update from that other network.
For some reason, Windows 10 doesn’t provide a built-in way to set a wired Ethernet connection as a metered connection, even though many ISPs impose bandwidth caps. You can, however, enable it with a registry hack.
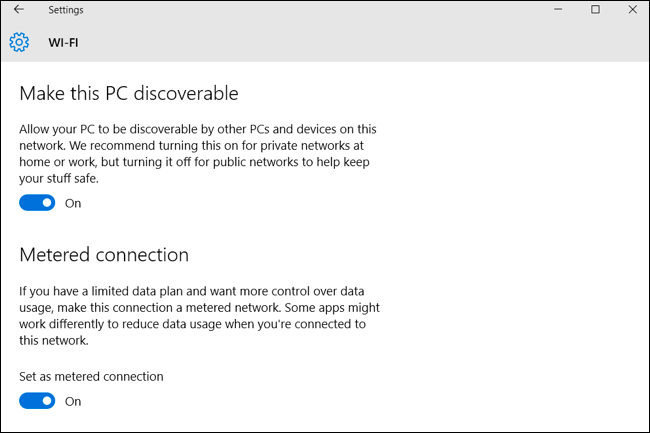
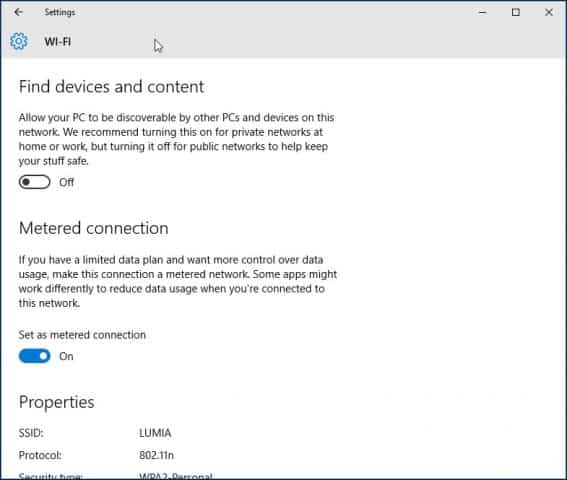
To set your Wi-Fi connection as a metered one, open the Settings app, and go to Network & Internet > Wi-Fi. Scroll down below the list of Wi-Fi networks and select “Advanced Options.” Enable the “Set as Metered Connection” slider here. This will only affect the Wi-Fi network you’re currently connected to, so Windows 10 will start automatically downloading updates when you connect to another network. To set another Wi-Fi network as metered, you’ll need to connect to it and change the option again. Windows 10 remembers this option for each Wi-Fi network you enable it for, however, so it will be automatically set the next time you connect.
Disable Automatic Peer-to-Peer Update Sharing
By default, Windows 10 automatically uses your Internet connection to upload Windows and app updates to other Windows 10 PCs. It’s a BitTorrent-style system for distributing updates to Windows 10 users. Unlike the average BitTorrent client, Windows does this silently in the background without warning you first. Windows 10 won’t upload updates if you set a connection as metered, but you can also turn it off directly.
To prevent the automatic uploads on all networks, you’ll need to open the Settings app, go to Update & Security > Windows Update and click “Advanced Options.” Click “Choose How Updates are Delivered” and set this option to just “PCs on My Local Network” or disable it.

Prevent Automatic App Updates and Live Tile Updates
If you set a Wi-Fi network as metered, Windows 10 won’t automatically install app updates and fetch data for live tiles when you’re connected to that network. However, you can also prevent this from happening on all networks.
To prevent Windows 10 from updating Windows Store apps on its own, open the Store app. Click or tap your profile picture near the search box and select “Settings.” Disable the “Update Apps Automatically” checkbox. You can still update your Store apps manually from the Windows Store app, but Windows won’t automatically download app updates on its own.
This is useful even if you haven’t installed any apps from the Store. Many of Windows 10’s included apps are updated through the Store.

Those live tiles on your Start menu use a bit of data, too–although not much. You won’t save much data by disabling live tiles, but you can do it if you want to save every little bit.
To prevent a tile from automatically downloading and displaying new data, right-click or long-press it in the Start menu, point to “More,” and select “Turn Live Tile Off.”

Save Data on Web Browsing
There’s a good chance that a lot of your data usage comes from your web browser–you can see just how much by looking at the Data Usage screen.
To save data on this web browsing, use a web browser that includes a built-in compressing proxy feature. The web browser will route the data through other servers where it’s compressed before being sent to you. This is normally a feature common on smartphones, not desktop PCs, but if you really need to save data–maybe you have a satellite Internet connection with a very low data cap, for example–you may want to do this.
Google offers an official Data Saver extension for Google Chrome, and it functions the same as the Data Saver feature built into the Chrome browser on Android and iPhone. Install that into Google, and you’re good to go. The Opera browser also has a “Turbo mode“, which works similarly, if you’re more of an Opera fan.

Once you’ve got Windows 10’s automatic updates–and automatic uploading of updates–under control, the Windows operating system should be using very little data on its own. Most of your data use will come from your web browser and the other apps you use. You’ll need to keep an eye on those apps and configure them to use fewer data. For example, you could configure Steam and other game stores to not automatically download updates for your installed games.
You can also see 7 Ways to Reduce How Much Data Your Windows 10 PC consumes
A Windows 10 PC connected to the internet helps you get the best out of your computer. However, this comes at a cost as Windows 10 is naturally one heck of a data-demanding operating system. If you are using a limited or capped data plan to access the internet on your PC, you’d definitely want to monitor and reduce how much data the Windows 10 OS consumes. That’s why we’ve listed seven (7) different ways to get that done in this post.

Even if you don’t have a limited internet plan, these methods are useful. Also, it’s about time you’ve noticed that your Windows 10 PC consumes way too much data than usual. So, to use your internet plan judiciously, you should also reduce your Windows 10 computer data usage using the tips listed below.
ALSO ON GUIDING TECH
1. MAKE CONNECTION METERED
One of the easiest ways to make your Windows 10 computer use less data than it normally would is to make your internet connection metered. On a metered network, your Windows computer will suspend some data-consuming activities like the automatic download of Windows updates, automatic app updates, automatic updates of Start Menu Tiles, and a few other functions that consume data in the background.
Here’s how to easily make your internet connection metered on any Windows 10 computer.
Step 1: Launch the Windows Settings menu.
Step 2: Select ‘Network & Internet’ option.

Step 3: In the Status section, Windows will show you the network your PC is currently connected to (could be Wi-Fi or Ethernet). To change the network status to metered, tap ‘Change network properties’ option.

Step 4: Scroll to the Metered connection section, and if the ‘Set as metered connection’ option is toggled off. Flick it on.

And that’s it. Your connection is now metered.
2. SET DATA LIMIT
For users on an internet plan with limited bandwidth, setting how much data you want to use on your PC is a brilliant way to reduce data usage. Let’s say your internet plan’s data bandwidth is capped at 20GB, and you don’t want your PC to use more than 2GB per week. So you can set a weekly data limit of 2GB on your computer. That way, you are in total control of your PC’s data consumption.
Before you set a data limit, having your PC’s connection set to metered (check method #1 above) could further help reduce data usage. Now, let’s see how to set a data limit on your Windows 10 computer.
Step 1: Launch the Windows Settings menu.
Step 2: Select ‘Network & Internet’ option.
Step 3: On the left-hand section, tap Data usage.

Step 4: In the Data limit section, tap the Set limit button.

NOTE: Ensure the active internet connection (that you want to reduce data usage on) is selected in the ‘Show settings for’ section.
Step 5: Choose the data limit type you want to set. On Windows 10, you can only set Monthly, One-time, or Unlimited data limits.

For each data limit, select the limit type, reset date, and the data limit unit (MB or GB).

Step 6: When you’re done configuring the data limit to your preference, tap Save.

When you’ve hit the set data limit, your computer notifies you about it. You can either readjust the data limit or remove it entirely. Navigate to Settings > Network & Internet > Data usage to edit or remove a data limit.

3. RESTRICT BACKGROUND DATA
By default, the Windows 10 OS is designed to use your internet data to install and update certain Windows Store apps. If left unrestricted, these background app updates could consume a huge chunk of your (limited) internet plan. Follow the steps below to restrict background data usage on your Windows 10 computer.
Step 1: Launch the Windows Settings menu.
Step 2: Select ‘Network & Internet’.
Step 3: On the left-hand section, tap Data usage.
Step 4: Scroll to the Background data section and select Never to restrict the background usage of data by the Windows Store.

Alternatively, if you have an active data limit set on your computer, you can restrict background data usage when you hit 10% of your data limit.

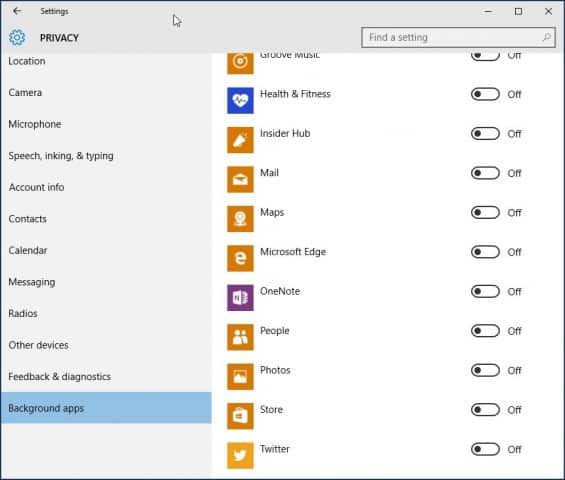
4. TURN OFF BACKGROUND APPS
The Windows 10 OS lets some app run in the background, even when the apps are closed, and you aren’t using them. Not only do some of these apps (with permission to run in the background) silently consume your internet bandwidth, they also run your PC’s battery down faster than usual.
If you are looking to limit your Windows PC’s data usage to the barest minimum, one thing to do is to turn off background apps or reduce the number of apps running in the background. Here’s how to go about it.
Step 1: Launch the Windows Settings menu.
Step 2: Select Privacy.

Step 3: Scroll to the bottom of the left-hand section and select Background apps.

Step 4: Tap the ‘Let apps run in the background’ option to toggle it off and disable background apps.

Alternatively, you can turn off select apps from running in the background. That way, the functioning of relevant apps won’t be disrupted.
Step 5: Scroll to the ‘Choose which apps can run in the background’ and turn off apps you don’t want running in the background.

5. DISABLE SETTINGS SYNCHRONIZATION
When you sign-in your Microsoft account to your PC, the Windows 10 operating system syncs the PC’s settings (and other configurations) to other computers you have the Microsoft account signed into. While this is a nifty feature, it consumes your data, and you most likely don’t need to have it on at all times.
To save data, you should disable this setting and only turn it on only when you need to sync your settings to other devices. Here’s how to get it done.
Step 1: Launch the Windows Settings menu.
Step 2: Select Accounts.

Step 3: Tap ‘Sync your settings’ option.

Step 4: Toggle off the Sync settings option.

6. TURN OFF MICROSOFT STORE AUTO-UPDATE
On every Windows 10 PC, default Windows app or apps you manually install from the Microsoft Store are set to get updated automatically as soon as there’s a new version available. While automatic app updates come with its advantages, it’s bad for your limited data/internet plan. Although making your internet connection metered temporarily halts these automatic app updates, you can (and should) also directly disable auto-update within the Microsoft Store.
Here’s how to get it done.
Step 1: Launch your PC’s Microsoft Store.
Step 2: On the homepage, tap the three-dotted menu icon at the top-right corner.

Step 3: Next, select Settings.

Step 4: Toggle off the ‘Update apps automatically’ option.

7. PAUSE WINDOWS UPDATES
Windows updates are important; they fix bugs and generally help your PC perform better. However, these updates are huge (size-wise) and could be a data hog, particularly if you are on a limited data/internet plan. A good way to reduce your PC’s Windows update-related data usage is to pause the update till a later date, preferably when you have access to an uncapped wireless or Ethernet network. Follow the steps below to see how it’s done.
Step 1: Launch your PC’s Windows Settings menu.
Step 2: Select ‘Updates & Security’ option.

Step 3: On the Windows Update page, select ‘Advanced options’ from the right pane.

Step 4: In the Pause update section, tap the Pause until the drop-down button to select a date you want to defer automatic download and installation of Windows updates till.

BE IN CHARGE
Unexpectedly exhausting your internet data plan before its expiration period could get annoying. Also, it will end up costing you more for activating those flexi-packs and what not. To prevent that, you should ensure that your computer uses your internet for the important stuff only. Take control and reduce your Windows 10 PC data usage by only letting the bare minimum activities access it for necessary updates.
You can also read How to Limit Windows 10 Data Use Over a Metered Connection
Living in a rural area comes with limits for bandwidth, and for me, that means I only have access to 3G networks. If you are like me, you might be coming to the realization that Windows 10 loves data…a lot. I don’t have any choice since I like to keep up with the latest and greatest in software. I noticed after upgrading to Windows 10 in 2015, my data plans were quickly eaten up in minutes. I started wondering what could be causing this? I had already done the standard task like setting my connection as Metered (which I will show you how). The data just kept disappearing. Eventually, I discovered the culprits.
Save on Your Windows 10 Data Usage
Set your connection as metered
One of the first things you can do is set your connection as metered. This will let Windows 10 know you don’t want significant updates and apps automatically downloaded. Go to Start > Settings > Network & Internet > Wi-Fi > Advanced Options.
Update: In the Windows 10 Anniversary Update, Metered connection is now located under Start > Settings > Network & Internet > Wi-Fi > your connection name.
Then toggle Toggle on Set as metered connection.
Update 2: The Windows 10 Creators Update makes it clearer about the installation of critical updates. I feel indifferent about this, but at the same time, I believe the company is not taking into account the realities of mobile broadband limitations. Some of these security updates are likely to be delivered as part of large cumulative updates, which exceed the allotment of some data plans.
If your 2-day allotment is 300 MBs and a cumulative update is near 1 GB; you are gonna run out of data before you can even apply the update. So, this is something users will need to watch out for. Windows 10 Home users won’t have any choice over the matter at all. With the premium business editions such as Pro and Enterprise, you can defer the updates until a suitable time. Hopefully, with differential updates in Windows Update, users running the Creators Update won’t have to worry too much about updates eating up their data caps.
Speaking of metered connections, the Creators Update now lets users set their Ethernet connections as metered. This was only limited to Wi-Fi, but there were registry hacks you could use in previous versions. Version 1703 makes it much as easier.
Turn off background apps
By default, Windows 10 keeps some apps running in the background, and they eat up a lot of data. In fact, the Mail app, in particular, is a major offender. You can turn off some of these apps by going to Settings > Privacy > Background apps.
Then toggle off apps that use background data that you don’t need. In my case, it was pretty much all of those apps that are listed. When Windows Updates or new versions are installed, these settings might be reset, so, periodically check it to make sure.
OneDrive
OneDrive was another part of Windows 10 I discovered sips data in the background. Although disabling it might be a drastic step, since it’s a critical selling point in the operating system, I don’t need to keep it running all the time. I go into town once a week, so if there are some files I need to sync, I do so at an Internet café.
To disable OneDrive, right-click the Taskbar and click Task Manager or press CTRL + SHIFT + ESC.
Select the startup tab Then under the Startup tab you can disable OneDrive. For more on this type of action, check out our article: How to Disable Startup Programs in Windows 10.
You might also want to do this for other syncing clients such as Dropbox or Google Drive.

Disable PC Syncing
It may sound odd to disable such a hallmark feature in Windows 10. I love PC syncing, but I honestly don’t need to have it running around the clock. You can turn it off, and when you do need to keep things synced, you can easily turn it on.
Go to Settings > Accounts > Sync your settings and turn Sync settings off.
NOTE: You can only sync your settings if you’re using a Microsoft account to log in to Windows. If you’re using a local Windows account, the Sync settings option is grayed out.
If you think it’s a bit too much to completely turn off syncing, you can pick and choose some settings to sync.

Turn off notifications
Another area that I notice can save you some data is turning off Action Center Notifications. For instance, if you don’t need to have background apps notifying you of on-going activities, just disable it. Right-click on the Action Center icon in the system tray and select Turn on quiet hours.

Turn off Live Tiles
Feed-based apps such as News will retrieve the latest news and other information in the background. If you keep Live Tiles turned on. You don’t need to do this for every app, but for select apps like Mail, Twitter, Weather, and Facebook, you can keep it on. You can turn that off by right-clicking on the Tile and “Turn off live tile”.

Configure Windows Update to download updates over your local area network
Windows 10 introduces a cool enhancement to Windows Update I’m excited about; the option to have Windows Update download updates from a PC within your local network in a peer to peer fashion. It’s called Windows Update Delivery Optimization (WUDO).
This is ideal for scenarios where you are using a metered connection and have multiple PCs running Windows 10. You can use one PC to update the other one as long as they are the same architecture. You can enable this by going to Settings > Update & Security > Windows Update > Advanced Options > Choose how updates are delivered (yeah, it’s a setting that’s buried deep, unfortunately) and make sure it’s on. Also, make sure it’s set to PCs on my Local Network.
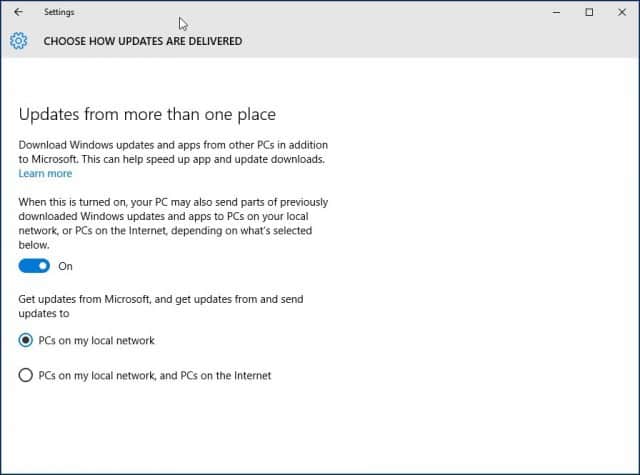
Note that WUDO is a controversial feature in Windows 10 for some. For Windows 10 Home and Pro, it’s set to send Windows Update data to other PCs on the Internet by default (it’s only set to PCs on my local network for Enterprise and Education editions). If you’re in a limited bandwidth situation, you don’t want to be sharing updates with other PCs on the Internet. For more on WUDO, read our article: Stop Windows 10 from Sharing Your Windows Updates to Other PCs.
Defer Windows Updates
If you are running Windows 10 Pro or Enterprise, there is an option in Windows Update settings that lets you delay the download of new features for several months. This can be significant since new feature improvements can be quite substantial. Also, this does not affect the download and installation of security updates, and neither does not it prevent the download of features indefinitely, but it’s a welcome stop-gap. Please note, when Defer Windows Updates is enabled, it also affects Microsoft Office Updates.
You can enable Defer Upgrades by going to Settings > Update, and Security > Windows Update > Advanced Options scroll down a bit and check: Defer upgrades.
The Pro, Enterprise and Education editions of Windows 10 Creators Update let you block updates completely up to 35 days, see our article for instructions on how to do it.